Showing posts with label decorating. Show all posts

Wednesday, August 8, 2012

Craft room re-moved!

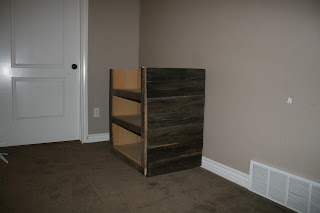
A while ago I showed you what I did in my scrapbook/craft room in this post. Wellll turns out we need the extra bedroom for a friend who needs somewhere to live. That means I needed to get creative with other spaces in my home to move my scrapbook area to. Right outside the extra bedroom is this rather large hallway, but more of a nook area...


The cabinet was storing linnens for the downstairs bedrooms, but after cleaning out my upstairs linnen closet, there was tons of room up there for that stuff. Poor kids are going to have to walk allll the way up stairs to get clean sheets. I think they will be ok. 
Thanks for the concern.

So I knew that I had almost no money to spend on this little project. I did have a little birthday money left, all tucked away for just this type of decorating emergency. After a trip to the ReStore, I was soo happy with the $42 I spent on all of this:


It took me a while at the store to make a plan, but once I figured it out...
shabammm!

See these pretty ugly particle board bookshelves?

Well with a couple of my favorite friends:

Old barnwood from my barn

Trusty Chopsaw

And good ol' air compressor

I measured, and cut, and nailed, and cut some more, 
and broke a nail!

Danggettt!!

After I got over my nail breakage, I stood back and this is what I had made...


I cut the two bookshelves in half, and put them one in front of the other to give it more depth. I then nailed the barnwood to the sides which served to hold the two bookshelves together nicely. Finally I trimmed out the front with some narrower barnwood I had. The wood counter-top was $4.00. Yes, that is four dollars! When my money tree has finished blooming I will do one of my counter top finishes on it and it will be spectacular!! You have to look into the future a little with me sometimes, cuz it all cain't happen at once ya know!

I moved one of my shelving units out of the scrapbook room and hung it, but then I've been a sicky-poo and don't have the strength to hang the other one yet. You'll have to wait a bit to see pictures of that. More to come on this project for sure! Just gotta get feeling better so I can do the fun stuff and not this computer sitting around stuff! 

So I know it's still a little rough, but what do ya think so far??


Too rustic for you? 

Just wait and see what's next!

 Can't wait to show y'all!


Wednesday, August 1, 2012

Old Iron fence, Rusty Tricycle, Chalk Paint and Me! Good times!

I've been waiting to show you something. 
My friend/client just made over her daughter's room.
I got to help a little.
But I couldn't show you until her daughter saw it first!
I don't have pictures of the whole room finished, 
just the two things I helped with.
I love them both. Really, I almost got giddy doing them.
Have you ever seen a puppy play with a ball, bouncing one way and then the other...
That was me.
Except, I don't have a tail or a wet nose.

Ready?

 Honestly, I loved the fence before I painted it. Old and rusty and just so very cool! I have 2 sections of this fencing propped up in my flower/weed garden, and then I just put a small section near my front door with some ivy climbing it. Love love L.O.V.E this fencing! The rust and chipping paint wasn't gonna work for this room. It's totally vintage, but I just couldn't let rusty paint chips fall off on to the bed below. SO my task was to make this old fence look old, but be clean and nice for her headboard. 
Here is what I started with...


 The picture above makes my heart race a little....
I'm weird, I know it, I've accepted it, you might want to also :)

I started with a good power wash to get anything off that wanted to come off. Followed that with a coat of Annie Sloan Country grey mixed with a little old white to lighten it a bit. After that I hit it with a smattering of straight Old White to help make the details pop a little. When that was dry..which was almost instantly, I lightly sanded the whole thing with a fine sanding pad just to burnish it a little and give it a smooth feel. Dust it off and voila! 


I have a few more of these fence sections around if anyone local is interested ;)


Now for the second project!!!
My friend used to ride this trike when she was a little girl.
Isn't it sooo amazing?!


Well her daughter thought it was amazing also and wanted it fixed up a little,
you know... cute-ify it a little?

That is where I came in.
Me and Annie Sloan.
Seriously, Chalk paint is so great!
What other paint can you just paint right over something like this without having to use a primer and even then I would have to use paint meant for metal..blah blah blah.

Crack me open some chalk paint and lemme at it!!
One more look at the before.
Before you die a little, I didn't paint the whole thing, just couldn't bring myself to do it.


And after...


 Sorry for the not-so-professional pictures. Sometimes it just is what it is. 
And today, this is what it is...

Alright-y then, I'm glad I could finally show ya..I mean it's been like 5 days! 
I thought I might die, but I made it through. 


On another note.
My studio.
It's done, and I actually am using it!
I'm preparing a class schedule and sooooooon 
Y'all can come paint with me!!

I'm so excited!
Hope you are too ;)


I'm so excited to be joining
"Meet Me Monday"

at one of my favorite blogs!
 http://youaretalkingtoomuch.blogspot.com/

If you stopped by from the party, so glad you came!
Hope you want to stay :)

Friday, June 29, 2012

"Bedroom Makeovers" Part One

I'm not sure how to start this post. I've had a lot on my mind, and a lot on my plate. I'd love to share what's on my mind, but it will wait. My studio is done, and waiting for me. Classes are in the works and projects are lined up; and yet, there it sits. About a month ago I had a moment. In that moment I decided that I had some projects in my home that I needed to get off "my list" before I can go gung-ho with the studio and my super exciting business plans. (yes, I said gung-ho, and I meant it) 

Wanna see some of my at-home projects?? 
I thought you might like to see...

First.......

While my girls where at their dad's for a summer stay I decided to makeover their rooms. My youngest two girls' rooms were painted "cute" already when we moved into this house a year and a half ago. I know that they were loved by the girls who lived in this house before, and that they were painted with love, so anyone who helped with the decor of these rooms for the previous family, please know I'm not unappreciative of what was done, and the circumstances under which it was done... ANYWAY!!!

This is the BEFORE of Riley's room....
(You may want sunglasses)


I had an almost non-existant budget, but lucky for me my sweet sister in law had some things she was getting rid of. And I made a trip to the thrift store for an idea I had for a head board. I had 2 major goals in this room:

1. To give my almost 12 yr old a more grown up room

2. To give her a "home" for all of her crafts, collections and "treasures"
 so that she can keep her room cleaner easier.

Here are my two main projects to be put in the room:
 Nice?? Can you see the potential?? 
I know, it's hard, but if you tilt your head a little, and then squint yer eyes, you can see it.

This could be a really long post, so I'll cut it short and get right to it. I added some trim to the top of both units, and then painted them both black with a paint/primer in one that worked great on the wood bookshelf, but not so great on the slick overlay on the other, wish I had been using chalk paint. I added wrapping paper to the back of the tall bookshelf and a cheap-o plastic table liner to the back of the entertainment center(along with a new back since it was missing most of it).

After a little of this and a little of that, her is the room AFTER:
WARNING>>>PICTURE OVERLOAD :)

On this wall I wanted her to see pictures of all the people that love her so much, and pictures of her as a baby and young girl so she can see how adorable she was. 
I don't think you can look at cute baby pictures of yourself and not feel special!
I already had all of these frames as well as the mirror which I painted.
 Here is the book shelf complete with a cute way to display and store her cute little collections, including a jar of crayon shavings I found when cleaning out her room. Just couldn't bring myself to throw it away! My lovely friend Mandy helped me with getting the room put back together and she did a great job staging the bookshelf! 


Did you see THIS dresser in the before pictures?:


I have a little secret about how I did the makeover on this dresser, I'm gonna save it for another post... I know, sorry.


 I picked up the light at a garage sale for $5. 
I used a lamp kit and rewired it so it could be a lamp.
I really like it.


Some of the frames are empty for now because I am waiting on some pictures, and I want her to help pick out some of the bigger Pictures.

 The posters and pictures she had plastered all over the walls I kept and put on her door. I know, some would be bothered by the clutter, but it's her room, and they are special to her.

Her closet wasn't very functional before, with almost no space to hang her clothes, I added two bars on the one side, and rearranged the existing shelving to make better space.

BEFORE:

After:
 She has a few boxes and a laundry basket full of "stuff" she gets to sort though and find a home for, so it's a little cluttered for now, but you can see the difference, I hope!

She's a girl, she's creative, and yes, she has a lot of stuff, but at least it all has a home now :)

SO there you have it, room one of two makeovers in the last two weeks. I'll post soon with the second room. I'm a bit in love with one thing I did, can't wait to show you!

DO you like the new room??
I feel that I accomplished my goals!
She had no idea I was doing this, when she came home she was a little upset because she could see remnants of me cleaning out her room by the trash can outside, as well as some boxes as she came into the house. After she walked in her room her mood changed drastically and I'm pretty sure she cried a little :) 

One of the best things about this room is that I only bought 3 things: 
1. The entertainment center I used for her headboard ($25)
2. The black paint/primer ($35 gallon which will get used)
3. The purple blanket/bedspread ($15 at Big Lots)

I already had everything else!

Would you like a room like this??
I pretty much love it :)