I showed you my floor, now for another fun project in my studio that's finally finished up!
Once upon a time I imagined a bathroom in the right hand
corner of the studio, see the pipes sticking up?...
corner of the studio, see the pipes sticking up?...
After the plumbing was in and the barn enclosed, we thought some walls might be nice.
I walked you through my distressed floor in this post
I was finally able to get the stain and sealer on the floor, now it looks like this:
I'm pretty durn happy about how it turned out! I love old wood floors! This is as close as I'm gonna get!
Now to show you what I really wanted to show you...
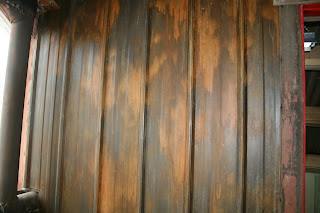
After the sheetrock was installed, I took some of the tin scraps from the outside of the barn and nailed 'em up to the outside walls of the bathroom...
Next I used a smattering of Modern Masters Metal Effects (our local hardware store has been selling it at 50% off, sadly I think they are clearing their inventory and won't be selling it anymore), mostly the Iron, but a little copper and bronze also...
After painting the whole thing and letting it dry completely, I sprayed Modern Masters rust activator fairly generously randomly and with a few spritz of blue patina spray as well. For the spray to activate you need to let it dry totally. After the first layer was dry I repeated it 2 more times which really allows the activator to do it's job and deepens the rust color. I finished it off with a water based clear coat and some old barn wood to trim the door.
Oh, the door. That would be another chalk paint project, definately didn't want to mess with priming and painting with latex.
Started with a random mess of blue and green.
I know it doesn't look like it, but I had a plan.
This was obviously followed by a nice coat of red. I left areas of the blue and green peek through the red. I then sanded a few areas to show even more of the underlying colors as well as sanding down to the bare wood. A nice coat of wax (dark in the corners and crevices, with clear everywhere) and this is what I have now...
Up close detail, sorry it's a little blurry, just squint your eyes tiny and it clears right up!
Maybe not...
So there you have it.
My bathroom is now ready for the "essentials" to be installed.
I will be really "relieved" when that is done.
What?
I had to sneak in a little potty humor, I just had to.
What d'ya think?
I'd love to hear your thoughts!
It makes my day when you take the time to comment,
and if you aren't a follower yet join the fun! I love a party!!
Next project...
bathroom counter and chalk paint vanity...
stay tuned!!


I really love how that turned out! Nice work!
ReplyDeleteBeautiful! What kind of sealer did you use on the floors? Any sealer on the walls, it looks glossy and beautiful
ReplyDeleteBeautiful! What kind of sealer did you use on the floors? Any sealer on the walls, it looks glossy and beautiful
ReplyDeleteBeautiful! What kind of sealer did you use on the floors? Any sealer on the walls, it looks glossy and beautiful
ReplyDelete